User Information
- who It is used to get information about currently logged in user on to system. If you don't provide any option or arguments, the command displays the following information for each logged-in user.
who
- whoami It display the system’s username
whoami
- id: It display the user identification(the real and effective user and group IDs) information
id
- groups: This command is used to display all the groups for which the user belongs to.
group
- finger: Used to check the information of any currently logged in users. i.e, It displays users login time, tty (name), idle time, home directory, shell name etc.
finger
This may not be available by default in many linux machines. In this case, you need to install it manually.
sudo apt install finger
- users: Displays usernames of all users currently logged on the system.
users
- grep: It is a powerful pattern searching tool to find information about a specific user from the system accounts file: /etc/passwd.
grep -i sj /etc/passwd - W Command: It(W) is a command-line utility that displays information about currently logged in users and what each user is doing.
w [OPTIONS] [USER] - last or lastb: Displays a list of last logged in users on the system. You can pass user names to display their login and hostname details.
last [options] [username] lastlog: The lastlog command is used to find the details of a recent login of all users or of a given user.
lastlogFile and directory commands
pwd The pwd(Present Working Directory) command is used to print the name of the present/current working directory starting from the root.
pwdls: The
lscommand is used to list files or directories. It also accepts some flags or options that changes how files or directories are listed in your terminal.mkdir The mkdir(make directory) command allows users to create directories or folders.
mkdir [folder_name]The option '-p' is used to create multiple directories or parent directories at once.
mkdir -p dir1/dir2/dir3- rmdir: The rmdir(remove directories) is used to remove empty directories. Can be used to delete multiple empty directories as well. Safer to use compared to rm -r FolderName. This command can also be forced to delete non-empty directories.
- Remove empty directory:
rmdir FolderName - Remove multiple directories:
rmdir FolderName1 FolderName2 FolderName3 - Remove non-empty directories:
rmdir FolderName1 --ignore-fail-on-non-empty - Remove entire directory tree. This command is similar to
rmdir a/b/c a/b a:rmdir -p a/b/c
- Remove empty directory:
- rm: The rm(remove) command is used to remove objects such as files, directories, symbolic links etc from the file system.
- Remove file: The rm command is used to remove or delete a file
rm file_name - Remove file forcefully: The rm command with
-foption is used for removal of file without prompting for confirmation.
- Remove file: The rm command is used to remove or delete a file
rm -f filename
- Remove directory: The rm command with -r option is used to remove the directory and its contents recursively.
rm -r myDir - Remove directory forcefully: The rm command with -rf option is used to forcefully remove directory recursively.
rm -rf myDir
touch: The touch command is is used to create, change and modify timestamps of a file without any content.
- Create a new file: You can create a single file at a time using touch command. The file created is an empty file.
touch file_name
- Create multiple files: You can create the multiple numbers of files at the same time.
touch file1_name file2_name file3_name
- Change access time: The touch command with a option is used to change the access time of a file.
touch -a file_name - Change modification time: The touch command with m option is used to change the modified time.
touch -m file_name - Use timestamp of other file: The touch command with
roption is used to get timestamp of another file.
In the above example, we get the timestamp of file1 for file2.touch -r file2 file1 - Create file with Specific time: The touch command with 't' option is used to create a file with specified time.
touch -t 1911010000 file_name- cat: The cat command is used to create single or multiple files, view contain of file, concatenate files and redirect output in terminal or files.
cat [OPTION] [FILE]
- cat: The cat command is used to create single or multiple files, view contain of file, concatenate files and redirect output in terminal or files.
- Create a file: Used to create a file with specific name, content and press exit using
CTRL + Dcat > file_name1.txt - View file contents: You can view contents of a single or more files by mentioning the filenames.
cat file_name1 file_name2 - More & Less options: If a file having a large number of content that won’t fit in the output terminal then
more&lessoptions can be used to indiate additional content.
cat file_name1.txt | more
cat file_name1.txt | less
File permissions
Since Linux is a multi-user operating system, it is necessary to provide security to prevent people from accessing each other’s confidential files. So Linux divides authorization into 2 levels,
Ownership: Each file or directory has assigned with 3 types of owners i. User: Owner of the file who created it. ii. Group: Group of users with the same access permissions to the file or directory. iii. Other: Applies to all other users on the system
Permissions: Each file or directory has following permissions for the above 3 types of owners.
i. Read: Give you the authority to open and read a file and lists its content for a directory.
ii. Write: Give you the authority to modify the contents of a file and add, remove and rename files stored in the directory.
iii. Execute: Give you the authority to run the program in Unix/Linux.
The permissions are indicated with below characters,
  r = read permission

  w = write permission

  x = execute permission

  \- = no permission
The below authorization levels represented in a diagram
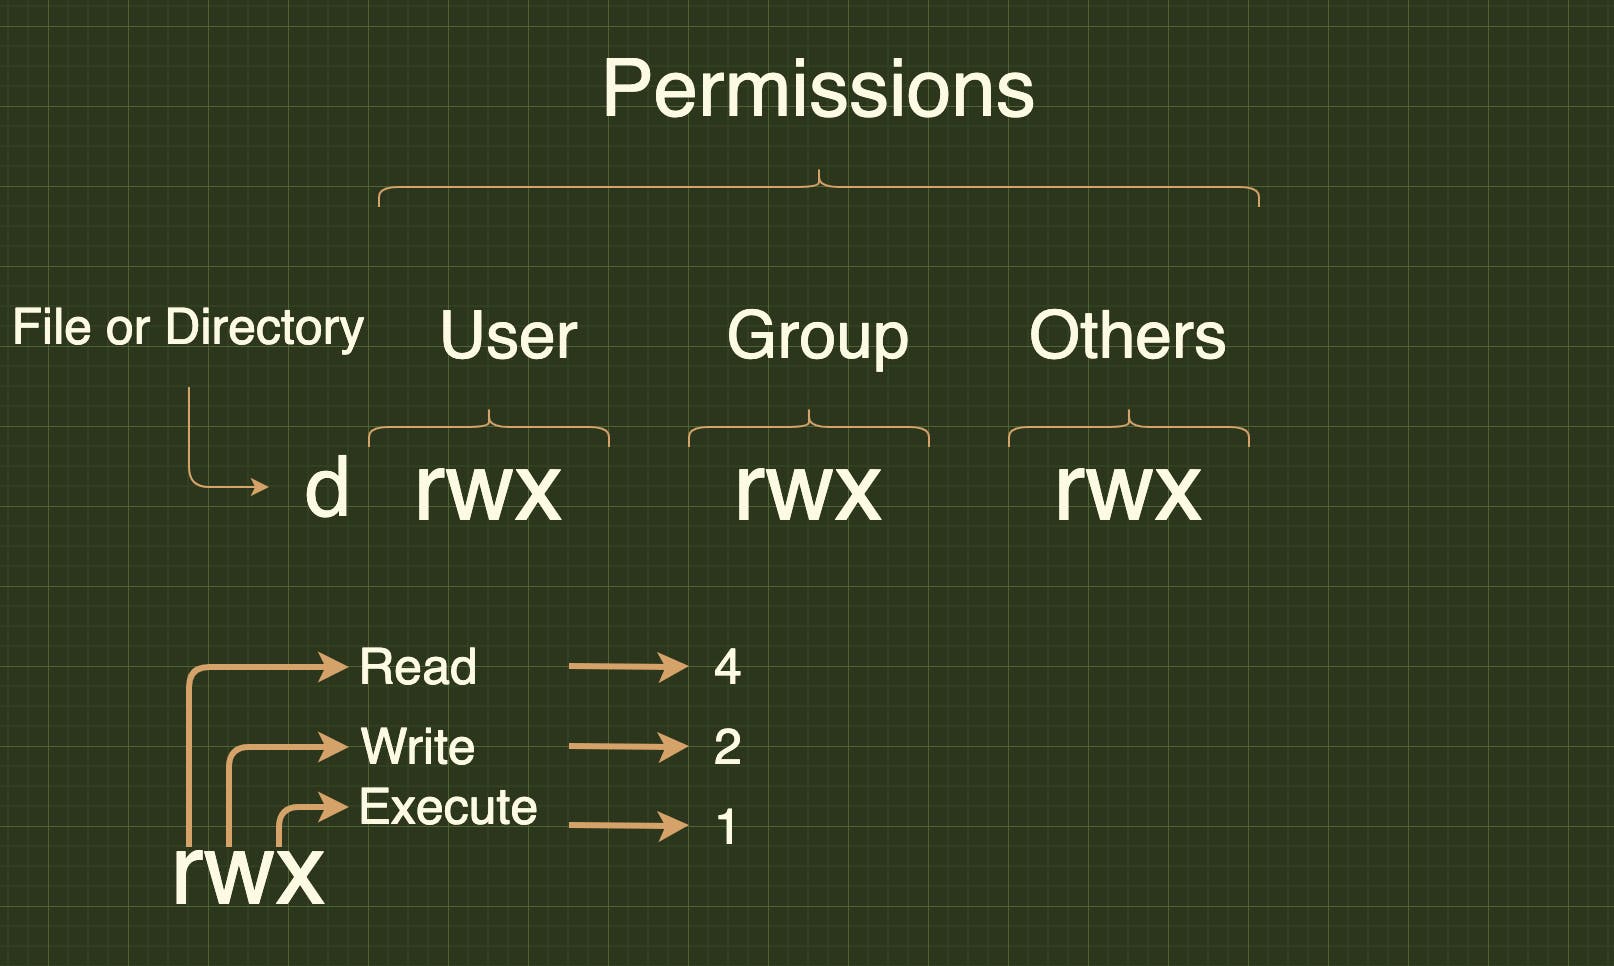 There is a need to restrict own file/directory access to others.
Change access: The chmod command is used to change the access mode of a file. This command is used to set permissions (read, write, execute) on a file/directory for the owner, group and the others group.
chmod [reference][operator][mode] file...

Example
chmod ugo-rwx test.txt
There are 2 ways to use this command,
- Absolute mode: The file permissions will be represented in a three-digit octal number.
The possible permissions types represented in a number format as below.
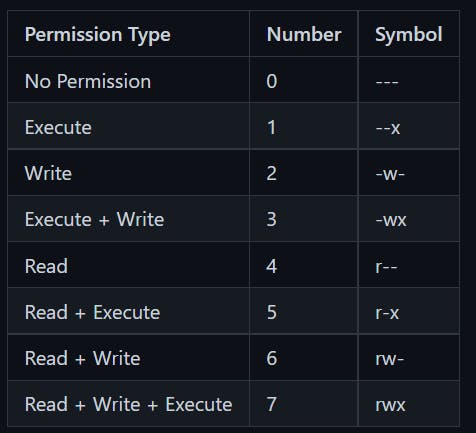 Let's update the permissions in absolute mode with an example as below,
chmode 764 test.txt - Symbolic mode: In the symbolic mode, you can modify permissions of a specific ownerunlike absolute mode.
The owners are represented as below,
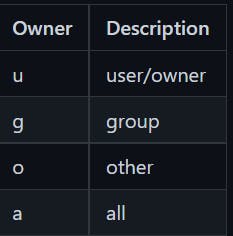 and the list of mathematical symbols to modify the file permissions as follows,
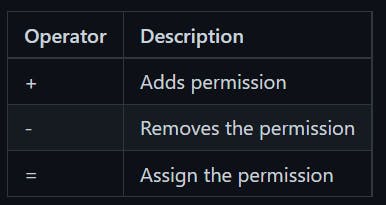
- Changing Ownership and Group: It is possible to change the the ownership and group of a file/directory using chown command.
chown user filename
chown user:group filename

Example:
chown John test.txt
chown John:Admin test.txt
- Change group-owner only: Sometimes you may need to change group owner only. In this case, chgrp command need to be used
chgrp group_name filename

Example:
sudo chgrp Administrator test.txt
Networking
- Display network information: ifconfig command is used to display all network information(ip address, ports etc)
ifconfig -a
- Test connection to a remote machine: Send an echo request to test connection of a remote machine.
ping <ip-address> or hostname

Example:
ping 10.0.0.11
- Show IP Address: Display ip address of a currennt machine
hostname -I
(OR)
ip addr show
- Active ports: Shows active or listening ports
netstat -pnltu
- Find information about domain: whois command is used to find out information about a domain, such as the owner of the domain, the owner’s contact information, and the nameservers used by domain.
whois [domain]

Example:
whois google.com
Installing packages
- Install package:
yum install package_name
- Package description: The info command is used to display brief details about a package.
yum info package_name
- Uninstall package: The remove command is used to remove or uninstall package name.
yum remove package_name
- Install package from local file: It is also possible to install package from local file named package_name.rpm.
rpm -i package_name.rpm
- Install from source code:
tar zxvf sourcecode.tar.gz
cd sourcecode
./configure
make
make install
Disk usage
- Synopsis: du command is used to check the information of disk usage of files and directories on a machine
du [OPTION]... [FILE]...
- Disk usage of a directory: To find out the disk usage summary of a /home/ directory tree and each of its sub directories
du /home/
- Disk usage in human readable format: To find out the disk usage in human readable format
du -h /home/
- Total disk usage of a directory: To find out the total disk usage
du -sh /home/
- Total disk usage of all files and directories: To find out the total disk usage of files and directories
du -ah /home/
- Total disk usage of all files and directories upto certain depth: print the total for a directory only if it is N or fewer levels below the command
du -ah --max-depth 2 /home/
- Total disk usage with excluded files: To find out the total disk usage of files and directories, but excludes the files that matches given pattern.
du -ah --exclude="*.txt" /home/
- Help: This command gives information about du
du
du --help
System and Hardware information
- Print all information: uname is mainly used to print system information.
uname -a
- Print kernel name:
uname -s
- Print kernel release:
uname -r
- Print Architecture:
uname -m
- Print Operating System:
$ uname -o
Search File
- Pattern search: The grep command is used to search patterns in files.
grep pattern files
grep -i // Case sensitive
grep -r // Recursive
grep -v // Inverted search

Example:
grep "^hello" test.txt // Hello John
grep -i "hELLo" text.txt // Hello John
- Find files and directories:
The
findcommand is used to find or search files and directories by file name, folder name, creation date, modification date, owner and permissions etc and perform subsequent operations on them.- i. Search file with name:
find ./directory_name -name file_name

Example:
find ./test -name test.txt // ./test/test.txt
- ii. Search file with pattern:
find ./directory_name -name file_pattern

Example:
find ./test -name *.txt // ./test/test.txt
- iii. Search file with executable action:
find ./directory_name -name file_name -exec command

Example:
find ./test -name test.txt -exec rm -i {} \; // Search file and delete it after confirmation
- iv. Search for empty files or directories: The find command is used to search all empty folders and files in the entered directory or sub-directories.
find ./directory_name -empty

Example:
find ./test -empty
//./test/test1
//./test/test2
//./test/test1.txt
- v. Search for files with permissions: The find command is used to find all the files in the mentioned directory or sub-directory with the given permissions
find ./directory_name -perm permission_code

Example:
find ./test -perm 664
- vi. Search text within multiple files:
find ./ -type f -name file_pattern -exec grep some_text  {} \;

Example:
find ./ -type f -name "*.txt" -exec grep 'World'  {} \; // Hello World
- Whereis to locate binary or source files for a command: The whereis command in Linux is used to locate the binary, source, and manual page files for a command. i.e, It is used to It is used to find executables of a program, its man pages and configuration files.
whereis command_name

Example:
whereis netstat //netstat:  /bin/netstat /usr/share/man/man8/netstat.8.gz(i.e, executable and location of its man page)
- Locate to find files: The locate command is used to find the files by name. This command is faster compared to find command because it searches database for the filename instead of searching your filesystem.
locate [OPTION] PATTERN

Example:
locate "*.txt" -n 10 // 10 file search results ending with .txt extension
SSH
SSH (Secure Shell) is a network protocol that enables secure remote connections between two systems.
- Connect remote machine using IP address or machine name: The remote server can be connected with local user name using either host name or IP address
ssh <host-name> or <ip-address>

Example:
ssh 192.111.66.100
ssh test.remoteserver.com
- Connect remote machine using username: It is also possible specify a user for an SSH connection.
ssh username@hostname_or_ip-address

Example:
ssh john@192.0.0.22
ssh john@test.remoteserver.com
- Connect remote machine using custom port By default, the SSH server listens for a connection on port 22. But you can also specify the custom port.
ssh <host-name> or <ip-address> -p port_number

Example:
ssh test.remoteserver.com -p 3322
- Generate SSH keys using keygen: SSH Keygen is used to generate a key pair which consists of public and private keys to improve the security of SSH connections.
ssh-keygen -t rsa
- Copying SSH keys to servers: For SSH authentication,
ssh-copy-idcommand will be used to copy public key(id_rsa.pub) to server.
ssh-copy-id hostname_or_IP
- Copy a File Remotely over SSH: SCP tool is used to securely copy files over the SSH protocol.
scp fileName user@remotehost:destinationPath

Example:
scp test.txt test@10.0.0.64:/home/john/Desktop
- Edit SSH Config File SSH server options customized by editing the settings in
sshd_configfile.
sudo vim /etc/ssh/sshd_config
- Run commands on a remote server SSH commands can be executed on remote machine using the local machine.
ssh test.remoteserver.com mkdir NewDirectoryName // Creating directory on remote machine
- Restart SSH service: You need to restart the service in Linux after making changes to SSH configuration.
sudo ssh service restart
(or)
sudo sshd service restart
Vi/Vim-commands
Vi editor is the most popular text editor from the early days of Unix. Whereas Vim(Vi IMproved) is an improved version of vi editor to be used in CLI (command line interface) for mainly text editing tasks in many configuration files. Some of the other alternatives are Elvis, Nvi, Nano, Joe, and Vile. It has two main operation modes,
- Command Mode: It allows the entry of commands to manipulate text.
- Entry mode(Or Insert mode): It allows typed characters on the keyboard into the current file.
You can create a new file or open an existing file using
vi filenamecommand.
 vi <filename_NEW> or <filename_EXISTING> // Create a new file or open an existing file

 Example:
 vi first.txt
Let's see how do you create file, enter the content and leave the CLI by saving the changes.
- Create a new file named
first.txt - Press
ito enter the insert mode - Enter the text "Hello World!"
- Save the text and exit by pressing
:wq!command Check the entered text
Cursor movement
These commands will be used in Command mode.- Move cursor You can use arrow keys(left, right, up and down) to move the cursor on the terminal. But you can also other keys for this behavior.
 h        # Move left
 j        # Move down
 k        # Move up
 l        # Move right
- Jump one word These commands used to jump one word at a time
w        # Jump forwards to the start of a word
W        # Jump forwards to the start of a WORD
e        # Jump forwards to the start of a word
E        # Jump forwards to the start of a WORD
b        # Jump backwords to the start of a word
B        # Jump backwords to the start of a WORD
- Jump to start or end of a line or next line These commands used to jump starting or ending of a line or a next line.
^            # Jump to the start of a current line
$           # Jump to the end of a current line
return   # Jump to the start of a next line
- Move sides These commands used to moves all sides of the screen
Backspace # Move cursor one character to the left
Spacebar   # Move cursor one character to the right
H(High)      # Move cursor to the top of the screen
M(Middle)  # Move cursor to the middle of the screen
L(Low)       # Move cursor to the bottom of the screen
- Paging and Scrolling Paging is used to moves the cursor up or down through the text a full screen at a time. Whereas Scrolling happens line by line.
Ctrl + f      # move forward one full screen
Ctrl + b     # move backward one full screen
Ctrl + d     # move forward half a screen
Ctrl + u     # move backward half a screen
- Inserting Text These commands places vi in entry mode from command mode. First, you need to be in command mode to use the below commands.
i        # Insert text to the left of the cursor
I        # Insert text at the beginning of a line
ESC  # Exit insert mode
- Append
a    # Insert(or Append) text to the right of the cursor
A    # Insert(or Append) text at the end of a line
- Open a line
o    # Open a line below the current cursor position
O    # open a line above the current cursor position
- Editing Text
- Change word: Change word/part of word to right of cursor
cw
- Change line Change entire line
cc
- Change line from specific character Change from cursor to end of line
C
- Deleting Text
- Deleting One Character: Position the cursor over the character to be deleted and type x
x
X       //To delete one character before the cursor
- Deleting a Word: Position the cursor at the beginning of the word and type dw
dw
- Deleting a Line: Position the cursor anywhere on the line and type dd.
dd
Cut, Copy & Paste Copy, Cut and Paste operations can be done in either Normal or visual Mode.
- Normal mode: This mode appears on click of Esc key.
Copy There are various copy or yank commands based on amount of text to be copied. The y character is used to perform this operation.
- i. Copy an entire line: Just place the cursor at the beginning of the line and type
yy
- i. Copy an entire line: Just place the cursor at the beginning of the line and type
- Normal mode: This mode appears on click of Esc key.
Copy There are various copy or yank commands based on amount of text to be copied. The y character is used to perform this operation.
yy
- ii.Copy three lines: Just place the cursor from where to start copying and type
3yy
3yy
- iii. Copy word with trailing whitespace: Place the cursor at the beginning of the word and type
yaw
yaw
- iv. Copy word without trailing whitespace: Place the cursor at the beginning of the word and type
yiw.
yiw
- v. Copy right of the cursor: Copy text right of the cursor to the end of line using
y$command
y$
- vi.Copy left of the cursor: Copy text left of the cursor to the end of line using y^ command
y^
- vii. Copy text between the cursor and character: Copy text between the cursor and specified character.
ytx(Copy until x and x is excluded)
yfx(Copy until x and x is included)
Cut There are various cutting or deleting commands based on amount of text to be deleted. The d character is used to perform this operation.
- i. Cut entire line: Cut the entire line where the cursor is located
dd
- ii.Cut three lines: Cut the three lines starting from the place where cursor is located
3dd
- iii.Cut right of the cursor: Cut the text from the right of the cursor till the end of line
d$
- iv.Cut left of the cursor: Cut the text from the left of the cursor till the beginning of line
d^
Paste This operation is performed using p command to paste the selected text
p
Visual Mode In this mode, first select the text using below keys i. v (lowercase): To select individual characters ii. V (uppercase): To select the entire line iii. Ctrl+v: To select by block and perform copy, cut and paste operations using y,d and p commands
Exiting These commands are used to exit from the file.
:w        # Write (save) the file, but don't exit
:wq        # Write (save) and quit
:wq!        # Force write (save) and quit
:q            # Quit, but it fails if anything has changed
:q!        # Quit and throw away for any changes
